Hoe je thuis een doe-het-zelf-ijsbad kunt nemen?
Hoe je thuis een doe-het-zelf-ijsbad kunt nemen?
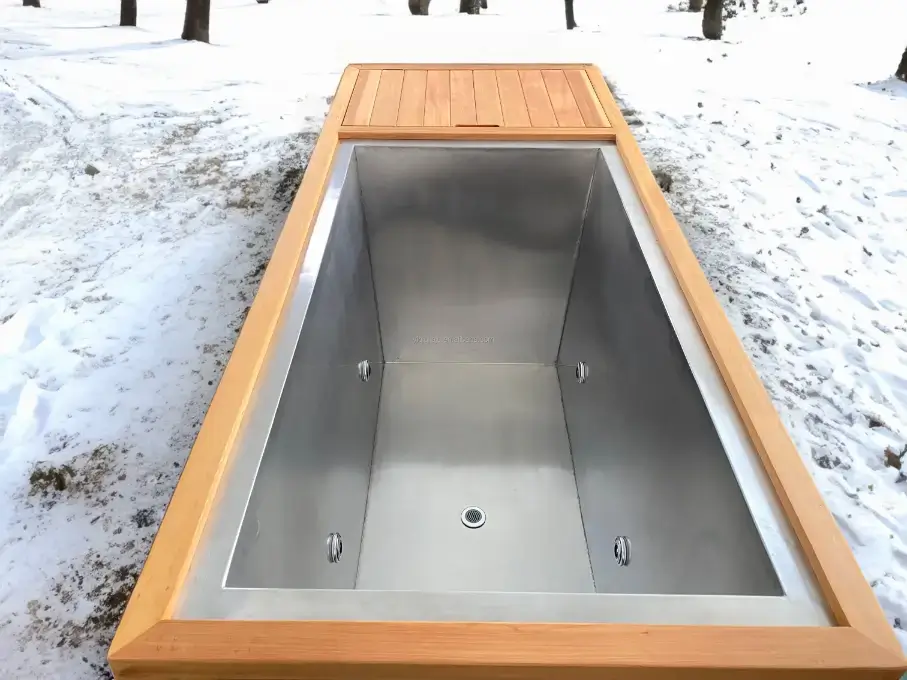
Bij het maken van plannen om een doe -het -zelf -ijsbad in uw gewoonte op te nemen, De eerste cruciale beslissing omvat het beslissen over de geschikte container. Een geschikte badkuip moet lang meegaan, voldoende gebied hebben om uw frame effectief te kunnen herbergen, en houd de watertemperatuur met succes vast. De selectie van kuipen is grotendeels afhankelijk, financiën, en persoonlijke opties. Hier zijn de meest gebruikelijke stijlen van kuipen die worden gebruikt voor ijsbaden, aan de zijkant van hun belangrijkste kenmerken.
Key Points:
- – Het kiezen van de juiste container is cruciaal voor een doe -het -zelf -ijsbad.
- – Stapsgewijze handleiding voor het opzetten van een doe-het-zelf-ijsbad thuis.
- – Tips voor het handhaven van de ideale watertemperatuur.
- – Veiligheidsrichtlijnen voor het gebruik van een ijsbad thuis.
- – Accessoires om uw doe -het -zelf -ijsbadervaring te verbeteren.
- – Efficiënt schoon en bewaar uw doe -het -zelf -ijsbadopstelling.
De juiste container kiezen voor uw doe -het -zelf -ijsbad
Bij het maken van plannen om een doe -het -zelf -ijsbad in uw gewoonte op te nemen, De eerste cruciale beslissing omvat het beslissen over het geschikte veld. Een geschikte badkuip moet lang meegaan, voldoende gebied hebben om uw frame effectief te kunnen herbergen, en houd de watertemperatuur met succes vast.
De selectie van de container is grotendeels afhankelijk, financiën, en persoonlijke opties. Hier zijn de meest gebruikelijke stijlen van dozen die worden gebruikt voor ijsbaden, aan de zijkant van hun belangrijkste kenmerken:

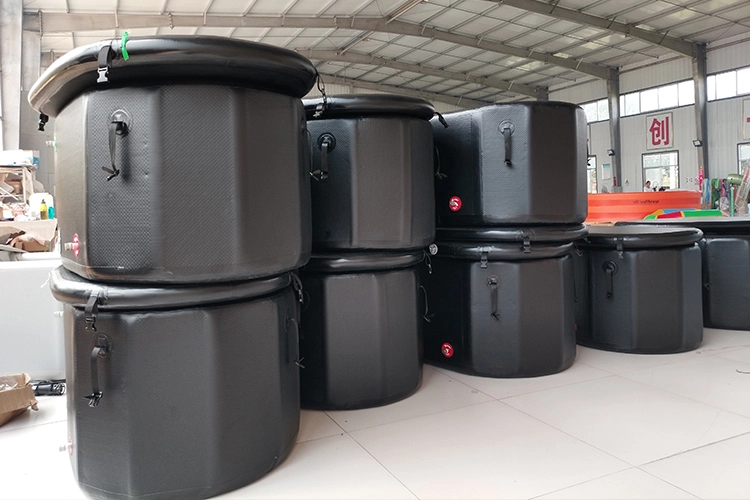


| Type | materiaal | Specificiteiten | Nadelen |
| Plastic kuipen | Plastic | Goedkoper, lichtgewicht | Kan barsten bij hoge temperaturen |
| Opblaasbare kuipen | PVC geborstelde stof | Draagbaar | Meerdere reparaties na een lek kunnen de efficiëntie beïnvloeden |
| Houten buizen | Hout | Langdurig, | Hout is vatbaar voor schimmel en schimmel |
| Metalen kuipen | Metaal | Schoon en hygiënisch, makkelijk schoon te maken | Niet gemakkelijk gestabiliseerd |
| Gemengde kuipen | Metalen voering, houten schaal | Langdurig, schoon en hygiënisch, makkelijk schoon te maken | Duur |
Tijdens het kiezen van een veld, Het is van cruciaal belang om de lastcapaciteit niet te vergeten, Vooral voor het geval u van plan bent om aanzienlijke hoeveelheden ijs of waterkoeler aan de zijkant van het water te hebben. Zorg ervoor dat de container het gemengde gewicht kan helpen zonder te vervormen of breken. Bovendien, voor degenen die esthetiek betalen of unieke ruimtebeperkingen hebben, Het uiterlijk en de dimensies van de container kunnen een cruciale positie spelen voor uw keuze-techniek.
Het behouden van een première ijsbadervaring vraagt om een container die niet het beste realistisch is, maar bovendien een aanvulling is op uw levensstijl. Of u nu een eenvoudig plastic badkuip kiest of een extra verfijnd draagbaar ijsbadbadysteem, Zorg ervoor dat het aan uw verlangens naar stevigheid voldoet, lengte, en thermische isolatie.
Uiteindelijk, Vergeet niet het gemak van reiniging en opslag. Een paar verpakkingscontainers zijn minder moeilijk te ontsnappen en gemakkelijk dan andere, wat een probleem kan zijn als u het ijsbad vaak gebruikt. Draagbaarheid kan ook cruciaal zijn als u het veld wilt bewegen of bewaren terwijl het nu niet in gebruik is.
Stapsgewijze handleiding voor het opzetten van uw doe-het-zelf-ijsbad
Het opzetten van een doe -het -zelf -ijsbad bij huishoudelijken brengt talloze vitale stappen in om te zorgen voor een veilige en effectieve genieten. Of u nu een atleet bent die op zoek is naar spierherstel of daadwerkelijk probeert te profiteren van de verkwikkende resultaten van koude onderdompeling, Het setup -systeem is van cruciaal belang. Hier is een diepgaande gids om u te helpen bij het opzetten van uw eigen ijsje.
1. Beslissen over de juiste omgeving
Eerst, pick out a area that can help the weight of a full ice bath and is close to a water source. An outdoor setting is right because it prevents any ability water harm to indoor floors and makes drainage less difficult. Make certain the spot is flat and strong.
2. Making ready the bathtub container
As soon as the vicinity is ready, prepare your box, which may be a massive tub, a sturdy plastic bin, or maybe a dedicated ice bath bathtub designed for repeated use. Make sure it is easy and free from any debris.
3. Filling the box
Fill the box with water faucet water to approximately 3-quarters of its ability. The amount of water need to be enough to submerge your frame as much as the neck whilst seated. Use a hose for convenience and time performance.
4. Adding Ice(Turn on the chiller)
Fill the box with water faucet water to approximately 3-quarters of its ability. The amount of water need to be enough to submerge your frame as much as the neck whilst seated. Use a hose for convenience and time performance.
If you have a chiller you can save these operations and just turn it on.
5. Temperature Adjustment
Use a thermometer to check the water’s temperature. Allow a few minutes for the ice to kick back the water thoroughly and regulate the temperature by way of including extra ice or a small quantity of heat water if wanted. Or control your waterkoeler through a mobile app.
6. Final arrangements
Earlier than entering the ice bath, make sure you have got a timer, towel, and warm clothing close by. It’s encouraged to restriction immersion time to 10-15 min, specifically for novices. Usually put together to go out the bathtub safely by using having guide like a handrail or close by fixtures.
By following these steps, your DIY ice tub might be set up efficaciously, allowing you to revel in the advantages of bloodless therapy within the comfort of your private home.
Tips for Maintaining the Ideal Water Temperature
Preserving the best water temperature for your DIY ice bath is crucial for maximizing its blessings while making sure safety. Here are numerous practical guidelines to help you acquire and keep the right temperature:
1. Monitoring Water Temperature
Regularly test the temperature of your ice tub the usage of a reliable water-proof thermometer. Intention for a water temperature between 3°C to 12°C, as this variety is generally taken into consideration surest for ice bath therapy.
2. Adjusting Ice quantities
The amount of ice wanted can range primarily based on the preliminary water temperature and the ambient situations. Begin with an initial dimension of water temperature and upload ice progressively. Right here’s a easy guideline:
| Beginning Water Temperature | Ice/Gallon |
| 60° F (15.Five°C) | 0.3 Kg |
| 70° F (21°C) | 0.5 kg |
| 80° F (26.5°C) | 0.8 kg |
3. Using Insulation strategies
To prevent fast temperature upward thrust, insulate your bath container. The use of insulation covers or wrapping the outdoors of the container with insulation blankets can extensively sluggish down the temperature boom because of external warmness.
4. Clean Ice Periodically
All through prolonged sessions, or on especially warm days, it could be important to feature additional ice to hold the best temperature. Reveal the temperature every five-10 minutes and upload ice as wanted.
5. Pre-cooling the Water
For a faster setup, pre-cool the water by way of storing the tub container filled with water in a fab vicinity, such as a shaded vicinity or interior if viable, earlier than adding ice. This method reduces the preliminary amount of ice required.
Via following these recommendations, you may keep the precise water temperature in your DIY ice tub, enhancing your revel in and maximizing the therapeutic advantages.
PS: If you have a waterkoeler purchased from Harman N you can say goodbye to the above cumbersome steps, just set your temperature 3 hours later you can enjoy the ice bath you want, thermostatic control is more durable !!!!!
How to Efficiently Clean and Store Your DIY Ice Bath Setup?
Keeping cleanliness and right garage of your DIY ice tub setup is critical for ensuring toughness and foremost performance. Hier, i will manual you thru the first-class practices for cleaning and storing your ice bathtub after each use.
Cleansing Your Ice tub
After every bath in your ice tub, it’s crucial to follow an intensive cleaning ordinary to prevent the buildup of bacteria and algae, particularly in case you’re the use of a portable pool or a big box. Start by means of draining all of the water straight away after use. Once emptied, scrub the surfaces with a slight disinfectant or a solution of bleach and water (a ratio of one:10 is generally powerful). Rinse the box thoroughly with clean water to do away with any residue of the cleansing agent.
Drying
After cleaning, make sure that the box is completely dry earlier than garage to save you mold and odors. If possible, depart it out inside the solar for a few hours or dry it manually with a towel. For storage, find a cool, dry place away from direct sunlight to prevent any harm to the material of the field. In case you’re using a collapsible model, ensure all parts are dry and well folded. Keep away from putting heavy objects on pinnacle of the stored container to hold it in desirable shape.
Harman N’s chiller has 4 layers of protection to ensure clean water.
- External Stainless Steel Mesh Prevents Large Particles From Entering The Bath Tubs
- PP Filter Cartridge For Detailed Powder Dust Filtration
- Ozone Generator Constantly Produces Ozone To Quickly Remove Microorganisms
- Ultraviolet Light Irradiator For Further Removal.
Harman N’s wants all ice bath enthusiasts to have more fun on a limited budget.
Fill out your contact information to explore the best ice bath options for you with a Harman N’s manager!
Het bedrijf vóór hem
Hoe je thuis een doe-het-zelf-ijsbad kunt nemen?
Bij het maken van plannen om een doe -het -zelf -ijsbad in uw gewoonte op te nemen, De eerste cruciale beslissing omvat het beslissen over de geschikte container. Een geschikte badkuip moet lang meegaan, voldoende gebied hebben om uw frame effectief te kunnen herbergen, en houd de watertemperatuur met succes vast. De selectie van kuipen is grotendeels afhankelijk, financiën, en persoonlijke opties. Hier zijn de meest gebruikelijke stijlen van kuipen die worden gebruikt voor ijsbaden, aan de zijkant van hun belangrijkste kenmerken.
Key Points:
- – Het kiezen van de juiste container is cruciaal voor een doe -het -zelf -ijsbad.
- – Stapsgewijze handleiding voor het opzetten van een doe-het-zelf-ijsbad thuis.
- – Tips voor het handhaven van de ideale watertemperatuur.
- – Veiligheidsrichtlijnen voor het gebruik van een ijsbad thuis.
- – Accessoires om uw doe -het -zelf -ijsbadervaring te verbeteren.
- – Efficiënt schoon en bewaar uw doe -het -zelf -ijsbadopstelling.
De juiste container kiezen voor uw doe -het -zelf -ijsbad
Bij het maken van plannen om een doe -het -zelf -ijsbad in uw gewoonte op te nemen, De eerste cruciale beslissing omvat het beslissen over het geschikte veld. Een geschikte badkuip moet lang meegaan, voldoende gebied hebben om uw frame effectief te kunnen herbergen, en houd de watertemperatuur met succes vast.
De selectie van de container is grotendeels afhankelijk, financiën, en persoonlijke opties. Hier zijn de meest gebruikelijke stijlen van dozen die worden gebruikt voor ijsbaden, aan de zijkant van hun belangrijkste kenmerken:
| Type | materiaal | Specificiteiten | Nadelen |
| Plastic kuipen | Plastic | Goedkoper, lichtgewicht | Kan barsten bij hoge temperaturen |
| Opblaasbare kuipen | PVC geborstelde stof | Draagbaar | Meerdere reparaties na een lek kunnen de efficiëntie beïnvloeden |
| Houten buizen | Hout | Langdurig, | Hout is vatbaar voor schimmel en schimmel |
| Metalen kuipen | Metaal | Schoon en hygiënisch, makkelijk schoon te maken | Niet gemakkelijk gestabiliseerd |
| Gemengde kuipen | Metalen voering, houten schaal | Langdurig, schoon en hygiënisch, makkelijk schoon te maken | Duur |
Tijdens het kiezen van een veld, Het is van cruciaal belang om de lastcapaciteit niet te vergeten, Vooral voor het geval u van plan bent om aanzienlijke hoeveelheden ijs of waterkoeler aan de zijkant van het water te hebben. Zorg ervoor dat de container het gemengde gewicht kan helpen zonder te vervormen of breken. Bovendien, voor degenen die esthetiek betalen of unieke ruimtebeperkingen hebben, Het uiterlijk en de dimensies van de container kunnen een cruciale positie spelen voor uw keuze-techniek.
Het behouden van een première ijsbadervaring vraagt om een container die niet het beste realistisch is, maar bovendien een aanvulling is op uw levensstijl. Of u nu een eenvoudig plastic badkuip kiest of een extra verfijnd draagbaar ijsbadbadysteem, Zorg ervoor dat het aan uw verlangens naar stevigheid voldoet, lengte, en thermische isolatie.
Uiteindelijk, Vergeet niet het gemak van reiniging en opslag. Een paar verpakkingscontainers zijn minder moeilijk te ontsnappen en gemakkelijk dan andere, wat een probleem kan zijn als u het ijsbad vaak gebruikt. Draagbaarheid kan ook cruciaal zijn als u het veld wilt bewegen of bewaren terwijl het nu niet in gebruik is.
Stapsgewijze handleiding voor het opzetten van uw doe-het-zelf-ijsbad
Het opzetten van een doe -het -zelf -ijsbad bij huishoudelijken brengt talloze vitale stappen in om te zorgen voor een veilige en effectieve genieten. Of u nu een atleet bent die op zoek is naar spierherstel of daadwerkelijk probeert te profiteren van de verkwikkende resultaten van koude onderdompeling, Het setup -systeem is van cruciaal belang. Hier is een diepgaande gids om u te helpen bij het opzetten van uw eigen ijsje.
1. Beslissen over de juiste omgeving
Eerst, pick out a area that can help the weight of a full ice bath and is close to a water source. An outdoor setting is right because it prevents any ability water harm to indoor floors and makes drainage less difficult. Make certain the spot is flat and strong.
2. Making ready the bathtub container
As soon as the vicinity is ready, prepare your box, which may be a massive tub, a sturdy plastic bin, or maybe a dedicated ice bath bathtub designed for repeated use. Make sure it is easy and free from any debris.
3. Filling the box
Fill the box with water faucet water to approximately 3-quarters of its ability. The amount of water need to be enough to submerge your frame as much as the neck whilst seated. Use a hose for convenience and time performance.
4. Adding Ice(Turn on the chiller)
Fill the box with water faucet water to approximately 3-quarters of its ability. The amount of water need to be enough to submerge your frame as much as the neck whilst seated. Use a hose for convenience and time performance.
If you have a chiller you can save these operations and just turn it on.
5. Temperature Adjustment
Use a thermometer to check the water’s temperature. Allow a few minutes for the ice to kick back the water thoroughly and regulate the temperature by way of including extra ice or a small quantity of heat water if wanted. Or control your waterkoeler through a mobile app.
6. Final arrangements
Earlier than entering the ice bath, make sure you have got a timer, towel, and warm clothing close by. It’s encouraged to restriction immersion time to 10-15 min, specifically for novices. Usually put together to go out the bathtub safely by using having guide like a handrail or close by fixtures.
By following these steps, your DIY ice tub might be set up efficaciously, allowing you to revel in the advantages of bloodless therapy within the comfort of your private home.
Tips for Maintaining the Ideal Water Temperature
Preserving the best water temperature for your DIY ice bath is crucial for maximizing its blessings while making sure safety. Here are numerous practical guidelines to help you acquire and keep the right temperature:
1. Monitoring Water Temperature
Regularly test the temperature of your ice tub the usage of a reliable water-proof thermometer. Intention for a water temperature between 3°C to 12°C, as this variety is generally taken into consideration surest for ice bath therapy.
2. Adjusting Ice quantities
The amount of ice wanted can range primarily based on the preliminary water temperature and the ambient situations. Begin with an initial dimension of water temperature and upload ice progressively. Right here’s a easy guideline:
| Beginning Water Temperature | Ice/Gallon |
| 60° F (15.Five°C) | 0.3 Kg |
| 70° F (21°C) | 0.5 kg |
| 80° F (26.5°C) | 0.8 kg |
3. Using Insulation strategies
To prevent fast temperature upward thrust, insulate your bath container. The use of insulation covers or wrapping the outdoors of the container with insulation blankets can extensively sluggish down the temperature boom because of external warmness.
4. Clean Ice Periodically
All through prolonged sessions, or on especially warm days, it could be important to feature additional ice to hold the best temperature. Reveal the temperature every five-10 minutes and upload ice as wanted.
5. Pre-cooling the Water
For a faster setup, pre-cool the water by way of storing the tub container filled with water in a fab vicinity, such as a shaded vicinity or interior if viable, earlier than adding ice. This method reduces the preliminary amount of ice required.
Via following these recommendations, you may keep the precise water temperature in your DIY ice tub, enhancing your revel in and maximizing the therapeutic advantages.
PS: If you have a waterkoeler purchased from Harman N you can say goodbye to the above cumbersome steps, just set your temperature 3 hours later you can enjoy the ice bath you want, thermostatic control is more durable !!!!!
How to Efficiently Clean and Store Your DIY Ice Bath Setup?
Keeping cleanliness and right garage of your DIY ice tub setup is critical for ensuring toughness and foremost performance. Hier, i will manual you thru the first-class practices for cleaning and storing your ice bathtub after each use.
Cleansing Your Ice tub
After every bath in your ice tub, it’s crucial to follow an intensive cleaning ordinary to prevent the buildup of bacteria and algae, particularly in case you’re the use of a portable pool or a big box. Start by means of draining all of the water straight away after use. Once emptied, scrub the surfaces with a slight disinfectant or a solution of bleach and water (a ratio of one:10 is generally powerful). Rinse the box thoroughly with clean water to do away with any residue of the cleansing agent.
Drying
After cleaning, make sure that the box is completely dry earlier than garage to save you mold and odors. If possible, depart it out inside the solar for a few hours or dry it manually with a towel. For storage, find a cool, dry place away from direct sunlight to prevent any harm to the material of the field. In case you’re using a collapsible model, ensure all parts are dry and well folded. Keep away from putting heavy objects on pinnacle of the stored container to hold it in desirable shape.
Harman N’s chiller has 4 layers of protection to ensure clean water.
- External Stainless Steel Mesh Prevents Large Particles From Entering The Bath Tubs
- PP Filter Cartridge For Detailed Powder Dust Filtration
- Ozone Generator Constantly Produces Ozone To Quickly Remove Microorganisms
- Ultraviolet Light Irradiator For Further Removal.
Harman N’s wants all ice bath enthusiasts to have more fun on a limited budget.
Fill out your contact information to explore the best ice bath options for you with a Harman N’s manager!
Over hun auteur

Welkom op onze blog! Mijn naam is Peter en ik ben de hoofdauteur van deze blog. Als sportherstelbeoefenaar en met diepe interesses en expertise.
Ik streef ernaar om complexe concepten op een heldere en bondige manier te presenteren, en lezers in staat stellen die kennis beter te begrijpen en toe te passen door middel van diepgaand onderzoek en het delen van ervaringen.
Bedankt voor het lezen en voor uw steun! Als u vragen of suggesties heeft over de inhoud, Neem dan gerust contact met mij op. Ik kijk ernaar uit om meer interessante en nuttige informatie met u te delen en samen te groeien op deze kennisreis!