How to take a DIY ice bath at home?
How to take a DIY ice bath at home?
When making plans to include a DIY ice bath into your habitual, the first crucial decision involves deciding on the suitable container. An appropriate tub must be long lasting, have sufficient area to accommodate your frame effectively, and hold the water temperature successfully. The selection of tubs in large part relies upon in your to be had area, finances, and personal options. Here are the most commonplace styles of tubs used for ice baths, at the side of their key characteristics.
Key Points:
- – Choosing the right container is crucial for a DIY ice bath.
- – Step-by-step guide for setting up a DIY ice bath at home.
- – Tips for maintaining the ideal water temperature.
- – Safety guidelines for using an ice bath at home.
- – Accessories to enhance your DIY ice bath experience.
- – Efficiently clean and store your DIY ice bath setup.
Choosing the Right Container for Your DIY Ice Bath
When making plans to include a DIY ice bath into your habitual, the first crucial decision involves deciding on the suitable field. An appropriate tub must be long lasting, have sufficient area to accommodate your frame effectively, and hold the water temperature successfully.
The selection of container in large part relies upon in your to be had area, finances, and personal options. Here are the most commonplace styles of boxes used for ice baths, at the side of their key characteristics:

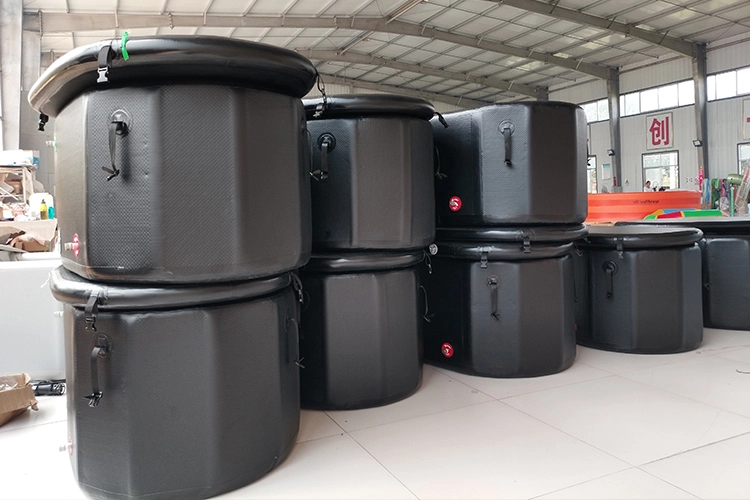


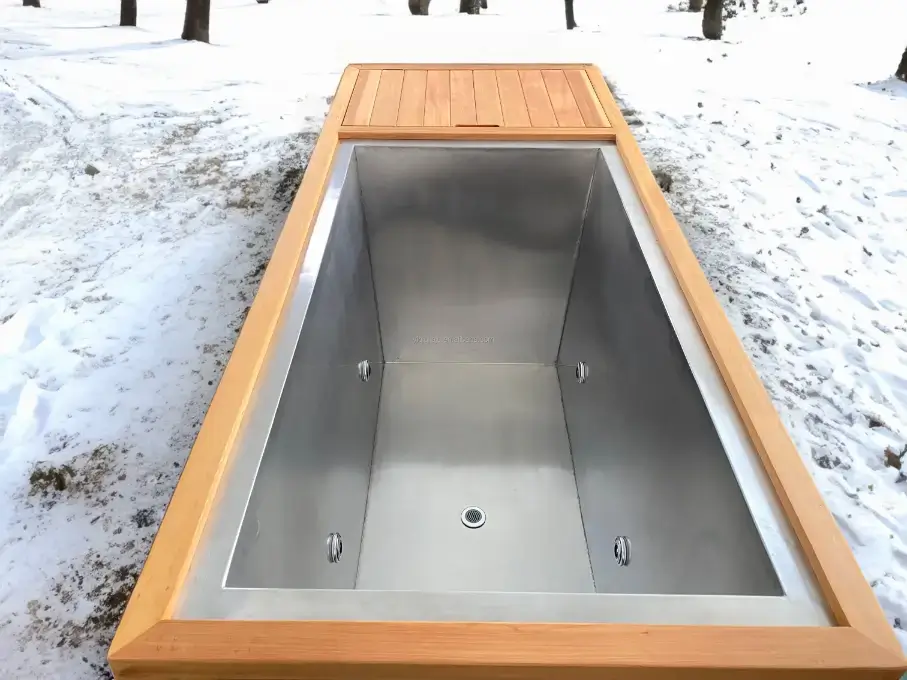
| Type | material | Specificities | Cons |
| Plastic tubs | Plastic | Lower priced, light-weight | Can crack at high temperatures |
| Inflatable tubs | PVC Brushed Fabric | Portable | Multiple repairs after a leak can affect efficiency |
| Wooden tubs | Wood | Long lasting, | Wood is prone to mold and mildew |
| Metal tubs | Metal | Clean and hygienic, easy to clean | Not easily stabilized |
| Mixed tubs | Metal liner, wood shell | Long lasting, clean and hygienic, easy to clean | Expensive |
While choosing a field, it is critical to don’t forget the burden capacity, particularly in case you plan to feature substantial quantities of ice or water chiller at the side of the water. Ensure the container can assist the mixed weight without deforming or breaking. Moreover, for those who fee aesthetics or have unique space constraints, the container’s appearance and dimensions may play a crucial position for your choice-making technique.
Retaining an premiere ice bath experience calls for a container that is not best realistic but additionally complements your lifestyle. Whether or not you choose a easy plastic bathtub or a extra sophisticated portable ice bathtub system, make sure it meets your desires for sturdiness, length, and thermal insulation.
Ultimately, don’t forget the convenience of cleansing and storage. A few packing containers are less difficult to drain and easy than others, which can be a finding out issue if you use the ice bathtub frequently. Portability also can be crucial if you want to move or keep the field while it’s now not in use.
Step-by-Step Guide to Setting Up Your DIY Ice Bath
Setting up a DIY ice bath at domestic entails numerous vital steps to ensure a safe and effective enjoy. Whether you’re an athlete looking for muscle recuperation or actually trying to benefit from the invigorating outcomes of cold immersion, the setup system is critical. Right here is an in depth guide to help you set up your own ice tub.
1. Deciding on the right vicinity
First, pick out a area that can help the weight of a full ice bath and is close to a water source. An outdoor setting is right because it prevents any ability water harm to indoor floors and makes drainage less difficult. Make certain the spot is flat and strong.
2. Making ready the bathtub container
As soon as the vicinity is ready, prepare your box, which may be a massive tub, a sturdy plastic bin, or maybe a dedicated ice bath bathtub designed for repeated use. Make sure it is easy and free from any debris.
3. Filling the box
Fill the box with water faucet water to approximately 3-quarters of its ability. The amount of water need to be enough to submerge your frame as much as the neck whilst seated. Use a hose for convenience and time performance.
4. Adding Ice(Turn on the chiller)
Fill the box with water faucet water to approximately 3-quarters of its ability. The amount of water need to be enough to submerge your frame as much as the neck whilst seated. Use a hose for convenience and time performance.
If you have a chiller you can save these operations and just turn it on.
5. Temperature Adjustment
Use a thermometer to check the water’s temperature. Allow a few minutes for the ice to kick back the water thoroughly and regulate the temperature by way of including extra ice or a small quantity of heat water if wanted. Or control your water chiller through a mobile app.
6. Final arrangements
Earlier than entering the ice bath, make sure you have got a timer, towel, and warm clothing close by. It’s encouraged to restriction immersion time to 10-15 mins, specifically for novices. Usually put together to go out the bathtub safely by using having guide like a handrail or close by fixtures.
By following these steps, your DIY ice tub might be set up efficaciously, allowing you to revel in the advantages of bloodless therapy within the comfort of your private home.
Tips for Maintaining the Ideal Water Temperature
Preserving the best water temperature for your DIY ice bath is crucial for maximizing its blessings while making sure safety. Here are numerous practical guidelines to help you acquire and keep the right temperature:
1. Monitoring Water Temperature
Regularly test the temperature of your ice tub the usage of a reliable water-proof thermometer. Intention for a water temperature between 3°C to 12°C, as this variety is generally taken into consideration surest for ice bath therapy.
2. Adjusting Ice quantities
The amount of ice wanted can range primarily based on the preliminary water temperature and the ambient situations. Begin with an initial dimension of water temperature and upload ice progressively. Right here’s a easy guideline:
| Beginning Water Temperature | Ice/Gallon |
| 60°F (15.Five°C) | 0.3 Kg |
| 70°F (21°C) | 0.5 kg |
| 80°F (26.5°C) | 0.8 kg |
3. Using Insulation strategies
To prevent fast temperature upward thrust, insulate your bath container. The use of insulation covers or wrapping the outdoors of the container with insulation blankets can extensively sluggish down the temperature boom because of external warmness.
4. Clean Ice Periodically
All through prolonged sessions, or on especially warm days, it could be important to feature additional ice to hold the best temperature. Reveal the temperature every five-10 minutes and upload ice as wanted.
5. Pre-cooling the Water
For a faster setup, pre-cool the water by way of storing the tub container filled with water in a fab vicinity, such as a shaded vicinity or interior if viable, earlier than adding ice. This method reduces the preliminary amount of ice required.
Via following these recommendations, you may keep the precise water temperature in your DIY ice tub, enhancing your revel in and maximizing the therapeutic advantages.
PS: If you have a water chiller purchased from Harman N you can say goodbye to the above cumbersome steps, just set your temperature 3 hours later you can enjoy the ice bath you want, thermostatic control is more durable !!!!!
How to Efficiently Clean and Store Your DIY Ice Bath Setup?
Keeping cleanliness and right garage of your DIY ice tub setup is critical for ensuring toughness and foremost performance. Here, i will manual you thru the first-class practices for cleaning and storing your ice bathtub after each use.
Cleansing Your Ice tub
After every bath in your ice tub, it’s crucial to follow an intensive cleaning ordinary to prevent the buildup of bacteria and algae, particularly in case you’re the use of a portable pool or a big box. Start by means of draining all of the water straight away after use. Once emptied, scrub the surfaces with a slight disinfectant or a solution of bleach and water (a ratio of one:10 is generally powerful). Rinse the box thoroughly with clean water to do away with any residue of the cleansing agent.
Drying
After cleaning, make sure that the box is completely dry earlier than garage to save you mold and odors. If possible, depart it out inside the solar for a few hours or dry it manually with a towel. For storage, find a cool, dry place away from direct sunlight to prevent any harm to the material of the field. In case you’re using a collapsible model, ensure all parts are dry and well folded. Keep away from putting heavy objects on pinnacle of the stored container to hold it in desirable shape.
Harman N’s chiller has 4 layers of protection to ensure clean water.
- External Stainless Steel Mesh Prevents Large Particles From Entering The Bath Tubs
- PP Filter Cartridge For Detailed Powder Dust Filtration
- Ozone Generator Constantly Produces Ozone To Quickly Remove Microorganisms
- Ultraviolet Light Irradiator For Further Removal.
Harman N’s wants all ice bath enthusiasts to have more fun on a limited budget.
Fill out your contact information to explore the best ice bath options for you with a Harman N’s manager!
الأعمال أمامه
أنت أيضا تريد أن تعرف هذه…
الأعمال أمامه
How to take a DIY ice bath at home?
When making plans to include a DIY ice bath into your habitual, the first crucial decision involves deciding on the suitable container. An appropriate tub must be long lasting, have sufficient area to accommodate your frame effectively, and hold the water temperature successfully. The selection of tubs in large part relies upon in your to be had area, finances, and personal options. Here are the most commonplace styles of tubs used for ice baths, at the side of their key characteristics.
Key Points:
- – Choosing the right container is crucial for a DIY ice bath.
- – Step-by-step guide for setting up a DIY ice bath at home.
- – Tips for maintaining the ideal water temperature.
- – Safety guidelines for using an ice bath at home.
- – Accessories to enhance your DIY ice bath experience.
- – Efficiently clean and store your DIY ice bath setup.
Choosing the Right Container for Your DIY Ice Bath
When making plans to include a DIY ice bath into your habitual, the first crucial decision involves deciding on the suitable field. An appropriate tub must be long lasting, have sufficient area to accommodate your frame effectively, and hold the water temperature successfully.
The selection of container in large part relies upon in your to be had area, finances, and personal options. Here are the most commonplace styles of boxes used for ice baths, at the side of their key characteristics:
| Type | material | Specificities | Cons |
| Plastic tubs | Plastic | Lower priced, light-weight | Can crack at high temperatures |
| Inflatable tubs | PVC Brushed Fabric | Portable | Multiple repairs after a leak can affect efficiency |
| Wooden tubs | Wood | Long lasting, | Wood is prone to mold and mildew |
| Metal tubs | Metal | Clean and hygienic, easy to clean | Not easily stabilized |
| Mixed tubs | Metal liner, wood shell | Long lasting, clean and hygienic, easy to clean | Expensive |
While choosing a field, it is critical to don’t forget the burden capacity, particularly in case you plan to feature substantial quantities of ice or water chiller at the side of the water. Ensure the container can assist the mixed weight without deforming or breaking. Moreover, for those who fee aesthetics or have unique space constraints, the container’s appearance and dimensions may play a crucial position for your choice-making technique.
Retaining an premiere ice bath experience calls for a container that is not best realistic but additionally complements your lifestyle. Whether or not you choose a easy plastic bathtub or a extra sophisticated portable ice bathtub system, make sure it meets your desires for sturdiness, length, and thermal insulation.
Ultimately, don’t forget the convenience of cleansing and storage. A few packing containers are less difficult to drain and easy than others, which can be a finding out issue if you use the ice bathtub frequently. Portability also can be crucial if you want to move or keep the field while it’s now not in use.
Step-by-Step Guide to Setting Up Your DIY Ice Bath
Setting up a DIY ice bath at domestic entails numerous vital steps to ensure a safe and effective enjoy. Whether you’re an athlete looking for muscle recuperation or actually trying to benefit from the invigorating outcomes of cold immersion, the setup system is critical. Right here is an in depth guide to help you set up your own ice tub.
1. Deciding on the right vicinity
First, pick out a area that can help the weight of a full ice bath and is close to a water source. An outdoor setting is right because it prevents any ability water harm to indoor floors and makes drainage less difficult. Make certain the spot is flat and strong.
2. Making ready the bathtub container
As soon as the vicinity is ready, prepare your box, which may be a massive tub, a sturdy plastic bin, or maybe a dedicated ice bath bathtub designed for repeated use. Make sure it is easy and free from any debris.
3. Filling the box
Fill the box with water faucet water to approximately 3-quarters of its ability. The amount of water need to be enough to submerge your frame as much as the neck whilst seated. Use a hose for convenience and time performance.
4. Adding Ice(Turn on the chiller)
Fill the box with water faucet water to approximately 3-quarters of its ability. The amount of water need to be enough to submerge your frame as much as the neck whilst seated. Use a hose for convenience and time performance.
If you have a chiller you can save these operations and just turn it on.
5. Temperature Adjustment
Use a thermometer to check the water’s temperature. Allow a few minutes for the ice to kick back the water thoroughly and regulate the temperature by way of including extra ice or a small quantity of heat water if wanted. Or control your water chiller through a mobile app.
6. Final arrangements
Earlier than entering the ice bath, make sure you have got a timer, towel, and warm clothing close by. It’s encouraged to restriction immersion time to 10-15 mins, specifically for novices. Usually put together to go out the bathtub safely by using having guide like a handrail or close by fixtures.
By following these steps, your DIY ice tub might be set up efficaciously, allowing you to revel in the advantages of bloodless therapy within the comfort of your private home.
Tips for Maintaining the Ideal Water Temperature
Preserving the best water temperature for your DIY ice bath is crucial for maximizing its blessings while making sure safety. Here are numerous practical guidelines to help you acquire and keep the right temperature:
1. Monitoring Water Temperature
Regularly test the temperature of your ice tub the usage of a reliable water-proof thermometer. Intention for a water temperature between 3°C to 12°C, as this variety is generally taken into consideration surest for ice bath therapy.
2. Adjusting Ice quantities
The amount of ice wanted can range primarily based on the preliminary water temperature and the ambient situations. Begin with an initial dimension of water temperature and upload ice progressively. Right here’s a easy guideline:
| Beginning Water Temperature | Ice/Gallon |
| 60°F (15.Five°C) | 0.3 Kg |
| 70°F (21°C) | 0.5 kg |
| 80°F (26.5°C) | 0.8 kg |
3. Using Insulation strategies
To prevent fast temperature upward thrust, insulate your bath container. The use of insulation covers or wrapping the outdoors of the container with insulation blankets can extensively sluggish down the temperature boom because of external warmness.
4. Clean Ice Periodically
All through prolonged sessions, or on especially warm days, it could be important to feature additional ice to hold the best temperature. Reveal the temperature every five-10 minutes and upload ice as wanted.
5. Pre-cooling the Water
For a faster setup, pre-cool the water by way of storing the tub container filled with water in a fab vicinity, such as a shaded vicinity or interior if viable, earlier than adding ice. This method reduces the preliminary amount of ice required.
Via following these recommendations, you may keep the precise water temperature in your DIY ice tub, enhancing your revel in and maximizing the therapeutic advantages.
PS: If you have a water chiller purchased from Harman N you can say goodbye to the above cumbersome steps, just set your temperature 3 hours later you can enjoy the ice bath you want, thermostatic control is more durable !!!!!
How to Efficiently Clean and Store Your DIY Ice Bath Setup?
Keeping cleanliness and right garage of your DIY ice tub setup is critical for ensuring toughness and foremost performance. Here, i will manual you thru the first-class practices for cleaning and storing your ice bathtub after each use.
Cleansing Your Ice tub
After every bath in your ice tub, it’s crucial to follow an intensive cleaning ordinary to prevent the buildup of bacteria and algae, particularly in case you’re the use of a portable pool or a big box. Start by means of draining all of the water straight away after use. Once emptied, scrub the surfaces with a slight disinfectant or a solution of bleach and water (a ratio of one:10 is generally powerful). Rinse the box thoroughly with clean water to do away with any residue of the cleansing agent.
Drying
After cleaning, make sure that the box is completely dry earlier than garage to save you mold and odors. If possible, depart it out inside the solar for a few hours or dry it manually with a towel. For storage, find a cool, dry place away from direct sunlight to prevent any harm to the material of the field. In case you’re using a collapsible model, ensure all parts are dry and well folded. Keep away from putting heavy objects on pinnacle of the stored container to hold it in desirable shape.
Harman N’s chiller has 4 layers of protection to ensure clean water.
- External Stainless Steel Mesh Prevents Large Particles From Entering The Bath Tubs
- PP Filter Cartridge For Detailed Powder Dust Filtration
- Ozone Generator Constantly Produces Ozone To Quickly Remove Microorganisms
- Ultraviolet Light Irradiator For Further Removal.
Harman N’s wants all ice bath enthusiasts to have more fun on a limited budget.
Fill out your contact information to explore the best ice bath options for you with a Harman N’s manager!
الأعمال أمامه
أنت أيضا تريد أن تعرف هذه…
About ther Author

Welcome to our blog! My name is peter and I am the lead author of this blog. As a sport recovery practitioner and with deep interests and expertise.
I am committed to presenting complex concepts in a clear and concise manner, and enabling readers to better understand and apply that knowledge through in-depth research and experience sharing.
Thank you for reading and for your support! If you have questions or suggestions about any of the content, please feel free to contact me. I look forward to sharing more interesting and useful information with you and growing together on this journey of knowledge!